

Although lace knitting charts are not for everyone, they are very useful for providing a visual indication of what your knitting should look like, and so many people choose to use them.
For example, if the chart looks like this:

Then your knitting should look like this:
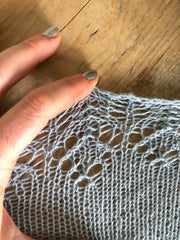
It enables you to easily see that the yarn over holes on the top row sit centred above the ones on the row below (for example), which means that as soon as you hit one that isn’t sitting right you can go back and find where the problem is.
Charts are read from right to left and bottom to top:
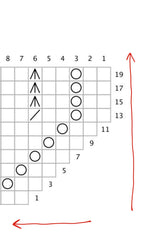
And they are easily memorised, for example in the repeated part of the chart below you can quickly see that the stitch repeat is simply ‘knit three, knit two together, yarn over, knit three’ and repeat all the way across the row.
If you keep losing your place (which is just as likely with written instructions and charts) there are a few options - you can get magnetic chart markers which you simply move up the chart as you work each row, or if the pattern is going to be sat flat a ruler will do the same job. Alternatively you might use a highlighter to cross off each row as you complete it - if you’re unsure simply use a pencil so that if you do have to unpick a row you can also rub out your line across it.

A couple of things to note:
- edging stitches are often not shown on charts
- Plain rows - usually the wrong side rows - are often not shown on charts
- Don’t make assumptions - read the pattern through to make sure that you’ve checked for this like this
On the whole, symbols in charts try to look something akin to what they are representing. For example, a circle O usually represents a yarn over because doing that creates a hold. A right leaning decrease often looks like this / and a left leaning decrease often looks like this \
Here are some commonly used lace chart symbols:

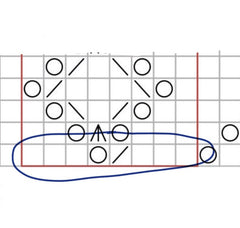
Stitch pattern repeats are usually highlighted by being surrounded in a red box, so you'll work the stitches outside the box once, then repeat the ones in the box over and over until you have the number of stitches left that are required for any further stitches indicated outside the left hand side of the box. So, for the row in the chart below (ignoring edging stitches for this example), you would work: knit two, yarn over, then repeat *knit three, knit two together, yarn over, knit three* until you have one stitch left, then knit one, and yarn over.
In case you're wondering, the pattern I've been using here in my examples is my Buttermere shawl. It's great for beginners, or for more advanced knitters who want something nice and easy. You can find the pattern HERE.
Further Reading
https://kcguild.org.uk/sharing-knowledge/lace-knitting/charts-lace-knitting/
https://tutorials.knitpicks.com/read-a-lace-chart/
https://blog.tincanknits.com/2014/06/06/how-to-read-a-knitting-chart/
I began in 2010 laceknitting and after a while becoming addicted. I knit many many lace , also Haapsalu shawls.See my www.gebreidesjaals.blogspot.com kind regards Mieke from the Netherlands