
We occasionally get asked “what tension does this yarn knit to?”, and this is information that we deliberately do not state on our yarn pages. There is a very good reason for that - the tension/gauge that you get is entirely down to you, the crafter. It’s no use me saying that such and such 4ply works to x number of stitches and x number of rows because any number of people might not be able to get that tension. Not only does it vary by needle size but it also varies by your own actual physical tension that you apply to the yarn as you use it. It can even change according to what type of needles - for example your row gauge might be different on bamboo needles compared to metal needles.
We can suggest a range of needle and hook sizes that WE think work with the yarn - and so we do do that based on our own extensive swatching and testing, but it’s only a guide. You might hate the way a 4ply yarn looks on 4.5mm needles for example. Or you might find 2.5mm needles far too small. The needle and hook sizes are there just to give you a rough idea, and a starting point. You will still need to decide for yourself what sort of fabric you prefer, and you will still need to swatch to find out which needle or hook size you will need to achieve the tension/gauge given in the pattern.
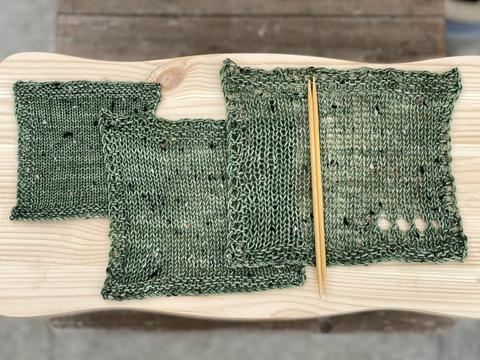
Below are three knitted swatches of our Keswick Fingering yarn (which has its own blog post with even more detail in HERE) - the left one was 2.5mm needles, the centre one was 3.5mm needles, and the right hand one was 4.5mm needles. You can see that all of these tensions/gauges work just as well, so if I'd quoted the tension for say the left hand swatch on our yarn bands all that tells you is one set of circumstances, which won't be what's required for all or even most projects.

There's also a blog post about Keld Fingering which has lots of tension/gauge info HERE.
To give you an example of how personal tension/gauge is even regardless of needle size - I have knitted pairs of socks where one sock is bigger than the other despite having the exact same number of rows and stitches, and it’s because my tension was looser on the second one - likely because I was knitting more slowly, or was distracted by something, or was just more relaxed compared to how I was when knitting the first one. This is quite common! And it’s a good reason to go straight on with the second sock when you finish the first, as I have found that the longer I leave it the more different the tension is. So, like I said… it’s no use at all me telling you that this yarn knits to x stitches and x rows, because it’s just too variable.
The question is - how can we actually properly know how thick a yarn is, and how that affects what we can expect when we knit or crochet with it? Well the answer is actually really simple - WPI. That’s wraps per inch, and it is the most accurate way to know how thick a yarn is. It’s also the best way to work out how thick a yarn is if you’ve lost the label and haven’t a clue!
To measure it, all you do is wrap the yarn around something - it can be a pencil or ruler, and measure how many strands fit in an inch.

Now.. again, this is also affected by the tension at which you wind it - if you stretch the yarn hard it’ll look thinner, so you want to wrap it quite loosely and let it just sit naturally. If the yarn has been sat wound into a ball (or on a cone) for ages it will be thinner - to be honest, ideally you want to wind it back into a skein, wash it, and let it bloom; then measure it. I know you won’t want to hear that but it’s the only way to see how thick it is.
It also makes a difference to a lot of yarn as to how it's been dried in the skein - for example if I take our Askham Aran which is a very lustrous baby alpaca/silk blend and I dry it laid flat what I get is a gorgeous plump, fluffy, cuddly yarn. However, if I dry the exact same yarn hanging vertically so it's weighing itself down (especially if it's dripping wet, as water adds weight) then the dry skein looks like a much thinner and silky-smooth almost DK-weight yarn. The key here is - how are you going to treat your finished garment? If you're planning to wash and dry it laid flat (which you should do really) then swatch and treat your yarn the same - wash your swatch and dry it flat (pinned out). Measure the WPI of the yarn with it held loosely so it can fluff out like you want your garment to. I hope that makes sense! I dry all of our yarn in such a way that it can bloom as it should - so for things like the Askham Aran I dry the skeins laid flat - I won't even hang it on the washing line because it stretches the yarn. For the most part you don't need to think too much about it - just wrap your yarn gently around a pencil or ruler and you'll be fine!
All of this should helpfully explain why we put WPI information on all of our labels, plus a range of needle and hook sizes to get you started, but NOT ‘tension’. It’s far too fluid and variable. I know that is is on a lot of the big commercial companies’ yarn bands and I think it’s just a throwback to a time when it was common to just give one set of information and think everyone would be rigidly able to use that. It’s not useful, and all it does is make you worry when you can’t get that tension/gauge. The ONLY tension/gauge numbers you should be looking at are the ones in your pattern.
Thank you, this very interesting and helpful!